Budget
The main portion of the screen for any specific plan displays the details listed below:
| Field | Instruction |
|---|---|
| Add plan | Click to create a new pricing plan. Read here for more details. |
| Target Start Date |
Displays the target start date for the opportunity. This defaults to the current date. |
| Matter Start Date | Displays the start date of the matter |
| First Time Entry Date | Displays the first time entry date for the matter (only if the matter has a time entry) |
| Budget Start | Enter the budget start date. For an exsisting Matter, default date is the Matter Start date. The First time entry date is also displayed (only if the matter has a time entry) |
| Target End Date |
The Target End Date is auto updated with the end date of the last phase added. Note if this is auto set and the plan is inactive, statistics will not update. If this is custom, and inactive, the statistics will still update. |
| Mode |
Select the mode at which the budget is to be planned. Top Down (by Amount): This option allows the firm partners to decide the total budget and then allocate it to phases by amounts. E.g. Partner A budget is $20,000. Top Down (by Percentage): This option allows the firm partners to decide the total budget and then allocate it to phases by percentage of amount. E.g. Partner A's budget is 25% of the $100,000 total budget. Top Down Mixed (by Amount and Percentage): This option allows the firm partners to decide the total budget and then allocate it to phases by amounts and also by percentage of amount. E.g. Partner A's budget is 25% of the total budget, and Partner B's budget is $17,000. Bottom Up: This option allows each practice area to plan the budget with cumulative input from various departments and offices and arrive at a total budget. |
| What-If Analysis | This tool allows you to select each phase from the budget and immediately analyze the impact of any discount or fees ( fixed fee & fee cap) applied to a pricing plan. This allows you to make faster and more accurate data-supported decisions. A manual refresh option is displayed to update the calculations whenever any changes are made to the phases. |
| Collapse All | Click to collapse / expand the phase panels on the page. Applicable when one or more phase(s) added. |
| Reports |
Click to view the modal Pricing Plan dashboard reports. Read here for more details. Note: This option is displayed if Pricing Plan entity dashboards are available. |
| More Actions | Click to access menu options for the Planning dashboard. Read here for more details. |
Tip: To return to the Matter Dashboard, click the matter name hyperlink at the top left corner of the Planning dashboard.
| Column | Description |
|---|---|
| Total Budget |
Displays the budget name (can be edited). Note: The top-level budget cannot be deleted. |
| Profit Per Partner (PPP) | (Total Net Budget - Cost Rate Planned)/Partner FTEs |
| Realization | (Net Budget/Total Budget at Firm Standard)*100 |
| Margin | [(WorkedAmount-Cost Rate Planned)/WorkedAmount]*100 |
| Leverage | Associate Worked Hours/ Partner Worked Hours (at Total Budget Level) |
| Hours | (Worked Hours) - (Write-Down Hours) |
| Average Rate | Net Budget / Total Worked Hours |
| Percentage | The percentage of the budget or phase. This will aggregate for the phases on the grand total. |
| Worked Total | Average Rate * Hours |
| Net Budget | Total Worked Amount including or excluding Net Adjustment |
| Grand Total | Total Worked Amount including or excluding Net Adjustment |
- Click to add a new pricing plan. This used to be called Add plan. In the Plan dialog, enter:
- Type: This is the type of plan: Existing Plan, or New Plan. This is required.
- For existing plan, select the existing matter.
Note: The functionality is to plan for Open, Active Matters or opportunities only. Users cannot select closed matters.
- Plan Name: Enter the Plan name. This is required.
- Arrangement: Select the arrangement to use for the plan. For selecting Planning rate cards, go here for details.
- Mode: Select the planning mode to use. This is required.
- Top Down (Amount)
- Top Down (Percentage)
- Top Down (Mixed Mode)
- Bottom Up: Certain KPIs will automatically calculate on any changes on this mode: Resource Worked Total, Phase Worked Total, Arrangement worked total, grand total level worked total, cost rate and total cost planned.
- Select from the three options available to create a model
- Create from a template: Select this option to create a pricing plan from the saved templates.
- Create with ( ) Resources: Select this option to create a pricing plan with drop-down added to select resources. The default number of resources is set to 3, this can be edited.
- Create Blank: Select this option to create a blank pricing plan with the selected fee arrangement added.
- Split Resources by: Allows to automatically split phases by Office, Department, Country or Region. This is similar to the Global Report Setting to split the phases.
Note: The functionality for Split Resources, only allows for Create Blank Plan. Other options will not properly create the model as of this time.
- Click Ok.
- On an existing Plan, find the Mode box on the top left side of the Planning page.
- Select the plan mode to change:
- Top Down (Amount)
- Top Down (Percentage)
- Top Down (Mixed Mode)
- Bottom Up: Certain KPIs will automatically calculate on any changes on this mode: Resource Worked Total, Phase Worked Total, Arrangement worked total, grand total level worked total, cost rate and total cost planned.
Note: A warning will appear if a user attempts to change a budget from a top level to a bottom up, and vice versa. Since changing the budget will erase the previously entered data, the user can confirm and continue, or cancel to stay on the current budget.
- The warning appears to Continue (if the old budget can be erased), or Cancel (to leave as-is).
Umbria 2019 supports 6 nested levels of phases, and single phases on the top level, out of the box.
The top phase level can be edited by the amount designated if using an amount based budget, but lower levels will be allocated by percentage, and roll up to the upper level.
To add a phase to a budget:
- Click the
 button next to the Total budget field. The option to add various sub-phases are displayed:
Note:
- You can only add a single phase to the top-level budget.
- On adding a phase to the top-level budget, by default a fee arrangement drop-down is displayed for the phase and is defaulted to Hourly (Standard). You can select the required fee arrangement from the drop-down. This fee arrangement cannot be deleted.
- You can add multiple fee arrangements within the top-level budget and add phases within the arrangements. To add a new fee arrangement, click the button next to the top level budget field and select Add Fee Arrangement.
| Option | Description | ||||||||||||||
|---|---|---|---|---|---|---|---|---|---|---|---|---|---|---|---|
| New Phase (free text) |
Select to add a single phase to the budget. Enter a Phase Name to describe the phase's purpose. Note: Under expense phases, the add phase option will not be available. |
||||||||||||||
| New Coded Phase |
Select to add a a predefined Phase Code. This determines the tasks and activities included. The phase codes can be added in the Admin>Planning Codes node. Note: Under expense phases, the add phase option will not be available. |
||||||||||||||
| More Options |
Tip: Based on the parent phase added, options to add the child phase is enabled/disabled for selection. For e.g., if you add a parent phase for New International Region, this option is disabled when adding a child phase under the Region parent phase or if you add an Office-Department parent phase, the option to add an Office phase, Department phase, or Office Department as child phase is disabled. |
||||||||||||||
| Add Phases From Template | Select to add a phase from a pre-defined template. All the saved templates are available here for selection. | ||||||||||||||
| Bulk Add Resources | Allows user to add resources in bulk to a phase. | ||||||||||||||
| Add Expense (free text) |
Select to add a single expense phase to the budget. Enter a Expense Name to describe the phase's purpose. |
||||||||||||||
| Add Expense | Select to add a drop-down for expense code and link the phase to the selected expense code. The expense codes can be added in the Admin>Planning Codes node. | ||||||||||||||
| Clone Phase | Select to quickly clone and replicate phases. You can choose to include or exclude the child phases added. In the Clone Phase dialog, enter the number of copies you want to create to replicate the selected phase. Select the option for the child phase and click Save Clone. A message shows to Fix percentages if they do not total 100%. At the end, it displays the recalculate button to recalculate the data. Then, the phase(s) will be cloned below the selected phases. | ||||||||||||||
| Add Recurrence | Select to add a recurring phase(s). This option is available for parent and child phase only. It cannot be added at sub-child level phase. Read here for more detailed instructions. | ||||||||||||||
| Add Resource |
Select to add resources to a budget and link the budget to the resource team. This option is also available at sub-phase level. Note:
Tip: Team Templates can be configured in Admin>People to Matters>Team Templates node. |
||||||||||||||
| Clear Resources |
Click to remove all the resources added to a budget/phase/ sub-phase. This option is available at all phase levels. Note: This option is available only if resources are added to a phase. |
||||||||||||||
| Add Fee Arrangement |
Select to add a new fee arrangement within a phase and add sub-phases to the selected fee arrangement. Once a phase or sub-phase is added to a top-level budget, the option to add a new fee arrangement will only be available at the top-level budget mode. A new fee arrangement cannot be added at phase or sub-phase level. |
||||||||||||||
| Add Adjustment | Select to apply discount or premium to a phase/budget. This option is also available at sub-phase level. | ||||||||||||||
| Add Rate Cost Increase | Select to add and adjust the rate and cost increase for resources. | ||||||||||||||
| Properties (Fee Arrangement) | Select to customize the fee type arrangement. This option is available at phase level. | ||||||||||||||
| Phase Properties | Select to customize the phase. This option is available at sub-phase level. | ||||||||||||||
| Delete | Select to delete the phase. This option is also available at sub-phase level. |
-
Based on the type of phase selected, further options for the phase are displayed. Select the relevant option from the drop-down.
Note: In the Top-Down mode, if the total amount of the budget is not fully allocated between phases or is over-allocated a message you will be prompted to update and will be presented with a Fix link. Similar link will be displayed if the total of the Hours Percentage column does not add up to 100%.
- The amount field displays the total for each phase. The total amount does not include any rate adjustments added or discounts applied.
Note:
- The top-level fee arrangement cannot be deleted
- A fee-arrangement can only be added from the top-level budget. The option to add fee-arrangement is not available at phase/sub-phase level.
The following columns are displayed under phases /resource grid. You can add /exclude columns from each phase from the More Actions menu at the top right corner. Select Manage Columns.
| Column | Detail | Description |
|---|---|---|
| Fee Arrangement (Level 2) | Fee Arrangement | Displays the selected Fee Arrangement |
| Start Date - End Date | Enter a Start and End Date for the phase. | |
| Leverage | Associate Worked Hours/ Partner Worked Hours (at phase level) | |
| Hours | Displays the total hours entered in the phase. | |
| Average Rate | Net Budget/Total Hours (at phase level) | |
| Percentage | In Bottom Up mode, the percentage of the amount allocated to phases is automatically calculated against the total amount entered for the budget. In Top Down mode, you can enter the percentage of the amount to be allocated for each phase. | |
| Worked Total | Average Rate * Hours (at phase level) | |
| Net Budget | Total Worked Amount including /excluding Net Adjustment | |
| Available only if resources are added to a phase | Photo/Resource Name/Title/Practice Area/Location | Displays the budget team member photo, name, fee earner class, primary area of law, and the office location. |
| KPI's displayed for Resources | Hours % |
Top Down: If Budget amount is assigned the default ratio numerator is picked from the Team template. If the budget amount is not assigned, the Hours % is calculated basis the base hours defined for the resource Bottom Up: N/A |
| Worked Hours |
Displays the pre-defined base hours entered for the resource when using Team Templates. |
|
| Write-Down Hours | Enter the write-down hours | |
| Hours | Worked Hours + Write-Down Hours | |
| Percent Discount of Rate | Enter a discount percentage that will apply to the planning rate | |
| Planning Rate | The Planning/Arrangement rate card applied to the phase. | |
| Percent Discount of Standard Rate | Click to enter percentage discount the client will receive off the standard rate. | |
| Standard Rate | Displays the firm standard rate for the resource | |
| Rate Override | Enter rate to override the planning/standard rate. | |
| Margin | (Worked Amount - Total Cost Planned) /Worked Amount | |
| Cost Rate Planned | Cost Rate planned for a resource. This value is auto populated from the database. | |
| Total Cost Planned | Worked Hours * Cost Rate Planned | |
| Total Cost Actual | Worked Hours * Cost Rate Actual | |
| Total | Planning Rate * Worked Hours OR Rate Override (if applicable) * Worked Hours | |
| Available only if planning for an Expense phase | Paid by | Select from the drop-down option if the Expenses will be paid by the Client or by the Firm and if the expenses will be reimbursed/ excluded from reimbursement, |
Add Phase(s) from a Template
- Click the button next to the budget name/phase name. Select Add Phases From Template.
- The Add Phases From Template dialog is displayed. The selected phase level (Level) and the phase name (Phase) is displayed.
- Select the Mode of the budget to use.
- All the saved templates are displayed in the left hand side panel. The last used date and the user name is displayed against each template. Select a template.
- The Preview tab in the right hand side panel displays the template structure of the selected template. If a template has multiple phases, all phases are selected by default. Click the Deselect all button to uncheck all the phases. You can also select/unselect any of the phases from the template.
- Click the Profile tab to view the template description details. Click Add to add the template to a pricing plan.
Search Template
The search bar is located at the top of the Add Phases From Template dialog.
- Type the template name in the search bar.
-
The dialog refreshes, showing a list of matching results and the entered search criteria.
- To clear search, click the X to remove the currently set criteria.
Advanced Search
- Click the drop down arrow in the right hand side corner of the search bar. to access the Advanced Search option.
- Enter your search criteria in any of the provided fields and click Search.
-
The dialog refreshes, showing a list of matching results and the set search criteria.
- To clear search, click the X to remove the currently set criteria.
Edit Template Profile
This option can be accessed from the Profile tab in the right hand side panel of the Add Phases From Template dialog.
- Click the Actions menu
 >Edit Profile.
 - In the Edit Templatedialog>Profile tab update the template description.
- Click Save.
Add/Edit Security to Template
This option can be accessed from the Profile tab in the right hand side panel of the Add Phases From Template dialog.
- Click Actions menu >Edit Profile.
- In the Edit Template dialog >Security tab update the template security.
- Click Add and select the User/Group to limit the template to selected users/groups. Click Save.
- To edit security (e.g., select a different user or group), click the pencil icon. To remove security, click the X. Click Save.
Delete Template
This option can be accessed from the Profile tab in the right hand side panel of the Add Phases From Template dialog.
- Click Actions>Delete Template.
-
You see a confirmation prompt to delete the template. Click OK to delete.
This option allows you to add a recurring phase through a simple-to-use dialog.
- Click the button next to the budget name/phase name. Select Add Recurrence.
- Select the Start Date for the recurring phase.
- The Start and End Enforcement will have Start and End date set as default. If keeping the default, set the End Date as well.
- In the drop-down for Period, select the recurrence option (Week, Month, or Quarter)
- Enter the number of times for the recurrence to repeat.
- The Net Budget is auto-populated.
- The Total amount is updated based on the recurrence number entered.
- Select the Phase Naming Template. The Templates can be configured in the Admin>Manage>Planning Phase Display Name Template node.
- Select Yes to auto renew the recurrence after the end date.
- Set the percentage/amount to increase the Net Budget for the recurrence. You can set this to None.
- Select Yes to send a notification email for renewal and the number of days before the end date for the reminder to be sent.
- Select the recipient of the notification.
- Click Save Recurrence. Based on the selected period, the recurrence is now added below the current phase.
To add a team to a budget/phase:
- Click the button next to the budget name/phase name. Select Add Resource.
- The Add Budget Team dialog is displayed. Select a team template or Matter Team from the Team Template drop-down menu. A list of people or classes populates. You can remove a resource from the list by clicking the X to the right of the resource's name. The deleted resource name is greyed out. To add the deleted member back, click the
 sign.
sign. - To add resources to the Budget team, click the Add Other Resource button.
- To add filters on the team, change the Country, Office, or Department filter.
-
Country: Filters the templates for a country
-
Office: Filters the templates for an office
-
Department: Filters the templates for a department
Note: When selecting Country first, the Office filter will then filter based on the country. The department filter will not, as currently there is no direct link between country and department.
- Click the Save button to continue. The selected team members are added to the Budget/Phase.
- To add more resources, click the Save + button. Or click the Add Other Resource button once more.
- Once team members are added to a phase/ budget you can add additional resources by clicking the button next to the resource name. Click the + sign to add an additional row at the end of the resource list. Select a resource from the drop-down list. You can remove a resource from the list by clicking the X sign.
- To replace a resource from the list, click the
 sign to the to the right of the resource's name.
To clear resources from a budget, phase or sub-phase
- Click the button next to the budget name/phase/sub-phase name. Select Clear Resources.
- Click Ok in the confirmation dialog displayed.
- The page will auto refresh and display updated calculations.
Note: This option is available only if resources are added to a phase.
Plans with unallocated amounts, hours or resources will be implicitly saved in the back end for going back into it.
Click the Save anyway button.
Note: This option is available in 2020. The plan must be fixed to finalize and activate the plan.
This option allows you to apply discount or premium to a phase/budget:
- Click the button next to the budget name/phase name. Select Add Adjustment.
- The Add Adjustment dialog is displayed. In the right side of the dialog, the total budget value /phase value is displayed.
Note: If discount has been applied previously on phases or on a budget with a resource phase then the Grand Total value (post adjustment) is applied.
- Select the relevant option from the Type drop-down. Select Fee Simple-Discount to apply discount or Fee Simple-Premium to apply premium amount for the phase.
- Select the phase from the Phase drop-down.
- Select the radio button to select the calculation mode. The amount calculated is displayed in the right side of the box next to Discount Amount or Premium Amount. The Fees-Sub-Total displays the total value after applying discount/premium.
- The Dynamic option allows you to enter a percentage value that the client will receive off/or will be charged over the total fee amount. The auto-calculated amount is displayed in the adjacent field.
- The Static option allows you to enter an amount that the client will receive off/or will be charged over the total fee amount. The auto-calculated percentage is displayed in the adjacent field.
- Select the Discount/Premium reason from the drop-down. The drop-down options can be set in Admin>Time>Write-DownReason.
- Enter a name for the Discount/Premium applied. Click the Add Adjustment button. The adjustment is applied to the phase and can be viewed under Net Adjustments.
- To Edit the applied Discount/Premium, click the button next to the discount/premium name and click Edit. To delete the applied option select Remove.
This option allows you to add and adjust the rate and cost increase for resources.
- Click the button next to the resource name. Select Add Rate and Cost Increase.
- The Phase start and end date are auto populated. This can be changed.
- The Rate and Cost % can be increased by Person, Class, Category, or on the Total phase value. Check box to select the option to be applied. Based on the option selected the tab in the lower panel is enabled to enter rate and cost changes. The tabs cannot be accessed unless the check box is selected.
- In the Person tab, click the + sign in the far right corner to enable a drop-down to select the resource. Select the resource and enter the Rate and Cost increase percentage. Similarly the rate and cost increase percentage can be entered in the Class, Category, and the Total tabs.
- In the lower panel of the dialog, enter the % of work to be completed in the phase before and after the rate increase. The total must be 100%. For e.g. If 40 % is entered against Pre-Increase and 60% against After-Increase, that indicates 40% of the work will be completed at the pre-decided rate and the rest 60% of the work will be completed with the new rates applied.
- Click the Calculate button to arrive at the Net Adjustment amount to be applied to the phase/budget.
Note: The Calculate button is enabled only if the the Pre-Increase and After-Increase % total to 100%.
| Column | Description |
|---|---|
| Rate % | Enter % increase for rate |
| Cost % | Enter % increase for cost |
| Pre-Increase % of Work | Enter % work completed before rate and cost increase |
| After Increase % of Work | Enter % work to be completed after rate and cost increase |
| Hours |
Based on the % entered in the Pre-Increase and After Increase % of work, the total hours entered for the budget/phase is split and auto calculated. For e.g.: Total Worked Hours entered for phase: 152 Pre-Increase % of work: 40% After Increase % of work: 60% Hours Pre-Increase: 40% of 152= 61 Hours After Increase: 60% of 152=91 |
| Adjusted Average Rate | Adjusted Total/Hours |
| Adjusted Total |
The Adjusted Total amount before and after rate % increase. For e.g. : Total phase amount: $20,000 Rate increase : 10 % Pre-Increase % of work: 40% After Increase % of work: 60% Adjusted Total Pre-Increase: $8,000 Adjusted Total After Increase: (Balance Phase amount) +(10% of Balance amount) 20,000-8000 = 12000 + 1200 = 13,200 |
| Net Adjustment |
Adjusted Total After Increase (Total of Pre + After increase) - Phase Total |
- Click Save to apply the rate and cost increase to the phase.
- The Rate and Cost Increase Adjustment is applied to the phase and can be viewed under Net Adjustments.
-
To Edit the applied rate increase, click the
button next to Rate and Cost Increase Adjustment and click Edit. To delete the applied option select Remove.
Click the button next to the fee arrangement and select Properties. This option allows you to customize the fee type arrangement and select the rate card to be applied to the arrangement. Read here for more details on Rates, Discounts & Guidelines.
Settings Tab
The Settings tab allows you to edit the Arrangement details.
| Field | Description | ||||||||
|---|---|---|---|---|---|---|---|---|---|
| Arrangement Type | Click to choose the arrangement type. | ||||||||
| Name |
Name given to the fee arrangement. |
||||||||
| Dates |
|
||||||||
| Amount | Enter the fee amount. This is a required field. This field is not displayed for Hourly (Standard) arrangement. | ||||||||
| Delivered By | Select the firm who will be providing the service. |
Rates, Discounts & Guidelines
This option allows you to select the rate card arrangement to be applied to the budget. Click the Rates, Discounts & Guidelines tab to update the rate card information.
| Field | Description |
|---|---|
| Type |
Select the rate card type to be applied. Options include:
Tip: The Fee Arrangement options can be set in the User Menu>Arrangements page |
| Matter Imported Card |
Displayed if Matter Imported Card is selected. Select the applicable rate card from the drop-down. Click View to open the matter arrangement rate card details. The matter arrangement details can be edited. Click Save to apply the changes to the matter. |
| Arrangement | Displayed if Firm or Client arrangement is selected. Select the applicable rate card. Click View to open the matter arrangement rate card details. The matter arrangement details can be edited. Click Save to apply the changes to the matter. |
| Apply Additional Discount (From Arrangement) | Displayed only for Firm or Client level arrangement. Click Yes to apply the discount applied in the selected arrangement rate card. |
Note: The Rates for a resource will be applied based on the Ordinal order applied on the Rate Card
Click the button next to the phase and select Properties. This option allows you to customize the phase settings.
The Phase Properties dialog displays the following information:
| Field | Description | ||||||||
|---|---|---|---|---|---|---|---|---|---|
| Settings tab | Type information in the provided fields, based on the table below and click Save Settings | ||||||||
| Repetition |
You can change the phase type from this drop-down. Based on the selection further fields are displayed for selection.
|
||||||||
| Currency | Select the currency to be applied to the phase | ||||||||
| Repetition | You can set the recurrence option for the phase. | ||||||||
| Start Date | Select the phase start date | ||||||||
| End Date | Select the phase end date | ||||||||
| Start/End Date Enforcement Rule |
Set the enforcement rule to be applied to the phase. NOTE: The default set in 2019.2.1 and 2020 is Start & End date. Recurrence budgets will not display properly if this default is not set.
|
||||||||
| Map other phase, task or activity codes | Select the time entry column to map to the selected phase. This option is not available if the selected phase type is Coded Phase. | ||||||||
| Mapped Codes | This option allows you to map task codes to a phase. Check the Override Label box to the customize the mapped code names. | ||||||||
| Delivered By | Select the firm who will be providing services for the phase | ||||||||
| Assumptions tab | Enter any additional information regarding the phases and click Save Assumption |
To update multiple phases in the budget, click the Next button to update the Phase Properties for the next phase. Click the Previous button to return to the previous phase.
Note: The updated settings for the current phase must be saved before clicking the Next button.
This option allows you to customize the expense settings.
The Expense Properties dialog displays the following information:
| Field | Description | ||||||||
|---|---|---|---|---|---|---|---|---|---|
| Settings tab | Type information in the provided fields, based on the table below and click Save Settings | ||||||||
| Repetition |
You can change the phase type from this drop-down. Based on the selection further fields are displayed for selection.
|
||||||||
| Repetition | You can set the recurrence option for the expense | ||||||||
| Start Date | Select the expense start date | ||||||||
| End Date | Select the expense end date | ||||||||
| Start/End Date Enforcement Rule |
Set the enforcement rule to be applied to the phase.
|
||||||||
| Map Internal Disbursement Codes | This option allows you to map task codes to a phase. . The expense codes can be added in the Admin>Planning Codes node. | ||||||||
| Limited to the following vendors | Select the radio button for Yes, to map the expense codes to the selected vendors only. Click the Add Code button to select and map the expense code to the vendors. | ||||||||
| Assumptions tab | Enter any additional information regarding the phases and click Save Assumption |
To update multiple expenses in the budget, click the Next button to update the Expense Properties for the next expense phase. Click the Previous button to return to the previous expense phase.
Note: The updated settings for the current expense must be saved before clicking the Next button.
Click the More Actions button in the top right corner of the screen to access the menu options.
| Menu | Description |
|---|---|
| Recalculate | Click to recalculate budget based on changes implemented. Recalculate will just say Recalculate. The hover over will say which kpi changed and will need updating. E.g. if it was Grand Total, it will say "The Budget Grand Total has changed. The entire plan and What If Analysis values need to be recalculated". There will be no Refresh button. |
| Duplicate | Makes a copy of an existing plan. When copying a pricing plan, both models are still available on the tab. |
| Finalize |
Click to activate the pricing plan. Read here for more instructions. |
| Unlock Phases | This option is displayed if the pricing plan locked using Finalize>Lock Phases only option. Select this option to unlock the phases. |
| Set as Default Plan | Select this option to set the current pricing plan as the default pricing plan. This option is also available in the Finalize Plan dialog. A  sign is placed on the pricing plan tab marked as default. sign is placed on the pricing plan tab marked as default. |
| Stop Monitoring |
This option is displayed once the pricing plan is activated using either of the Finalize options> Snapshot the complete plan or Snapshot the complete plan and create a duplicate plan for editing. The pricing plan is then monitored against the actual. Select this option to stop monitoring against the actual. However, the plan remains locked for editing. A red lock is added on the pricing plan tab. Tip: You can show / hide the Stop Monitoring option for various users. Admin: Permission Group: Global> View dashboard stop monitoring menu. |
| Resume Monitoring | This option is displayed if you selected Stop Monitoring. Click to resume monitoring against the actuals. However the plan is locked for editing. |
| Save as Template | Click to save the current pricing plan structure as a template. Read here for more instructions to save a template. The saved templates are available for selection when adding phases from a template. |
| Manage Columns |
Select to add/remove columns from Phases. The columns displayed by default are disabled. You cannot uncheck the columns. Check box to add additional columns. You can also drag and reorder the columns. Click Save to update changes. Note: The columns pertaining to the resources though selected, will only be displayed if resources are added to a phase/sub-phase. |
| Manage KPI Columns |
Select to add/remove columns from the What If Analysis panel. Check box to add additional columns. You can also drag and reorder the columns. Click Save to update changes. Refer What -If Analysis section for more details on the KPI columns. |
| Plan Options | Select to rename the plan or to change the rate card applied to a plan. Click Saveto update changes. |
| Export | Select this option to export the data to a template. Read here for detailed instructions. |
| Delete Plan | Click to delete a plan. Click Delete to remove a plan. If the plan is deleted, the statistics will be deleted too. |
Click to view the Pricing Plan reports added. This tab is enabled if a Pricing Dashboard is created.
The Pricing Plan Dashboard is available out of the box to use if desired.
- In the Admin>Dashboard node, click Add. Type information in the provided fields, based on the table below and click Finish
- In the Budget tab, the Reports button is now displayed. Click the Reports button to view the added dashboard.
- Click the action menu to edit the dashboard and add widgets. Read here for detailed instructions to edit the dashboard and add widgets to a dashboard.
- Click Save to apply changes. The Planning Modal reports are now updated with the added data.
The Pricing Plan Dashboard is available out of the box to use if desired.
- The following fields are available:
Field Resource Title Practice Area Office Location Hours Planning Rate Margin Worked Total Net Budget
To group by a column, drag the column to the area saying 'Drag a column header here'.
Available options on the page are:
| Field | Description |
|---|---|
| Edit Dashboard | Edit the dashboard layout and content. |
| Screenshot to PDF | Screenshot the current dashboard view completely and save as PDF. |
| Download as PNG | Download the current dashboard view as a PNG. |
| Copy to Clipboard | Copy values to clipboard. |
| Refresh | Refresh the dashboard. |
| Choose column | Choose columns on the dashboard. |
| Export to Excel | Export the dashboard values to excel. |
| Export to PDF | Export the dashboard to PDF. |
Saves the created pricing plan structure as a template (without saving the budgeted values). This template is available for selection when adding phases from a template. To save as template, click the More Options button in the upper-right of the screen to open the action menu. Click Save As Template.
Add Template Profile Details
- In the Profile tab, enter a name for the template. This is required field.
- Select Code Set from the drop-down. The codes available for selection here can be added in the Admin>Planning Code Sets node.
- Select the Author for the template.
- Make selection to limit the template for use only with certain clients and departments.
-
Type any additional notes in the Comments field.
- Click Save.
Add Security to a Template
This option allows you to restrict the template access to certain user/ groups and roles.
- In the Security tab, click Add and select the User/Group and the Role. Click Save.
- To edit security (e.g., select a different user/group or role), click the pencil icon. To remove security, click the X. Click Save.
Exports the current planning data to excel or pdf. To export the data, click the More Actions button in the upper-right of the screen to open the action menu. Click Export.
- Select the purpose of the export if the report is to be shared with Client or for Internal use.
- Select the file type for export. There are two options available Export to Excel or Export to PDF.
-
Select the excel export template from the drop-down. PDF files have built in templates. To make a template available for client selection, when adding a Planning template in Admin>Planning node, check the box for Client.
- Click Export.
Select this option to finalize and activate the pricing plan (model). The following options are displayed in the Activate Plan dialog:
| Option | Description |
|---|---|
| Lock Phases only (Resources will be editable) |
Select to lock the phases in the pricing plan. No other properties in the locked pricing plan can be edited, except the resources within the phases. A Yellow Tip: To edit the phase in a pricing plan locked using this option, click More Actions menu>select Unlock Phases. The Yellow lock sign is removed from the pricing plan tab. The phase properties can now be edited. Once you update the phase properties, click More Actions menu>select Finalize>select the relevant option to lock the pricing plan for editing. |
| Snapshot the complete plan |
Select to create a locked pricing plan. The locked pricing plan cannot be edited. A Green Tip: To edit the phase properties in a pricing plan locked using this option, click More Actions menu>select Stop Monitoring. On selecting this option the lock sign changes from Yellow to Red on the pricing plan tab. The phase properties can now be edited. Once you update the phase properties, click More Actions menu>select Resume Monitoring to lock the pricing plan for editing. The Yellow lock sign is again placed on the pricing plan tab. Only the phase properties can be edited using this option, other details in the locked pricing plan cannot be edited. |
| Snapshot the complete plan and create a duplicate plan for editing |
Select to create a locked pricing plan. The locked pricing plan cannot be edited. A duplicate copy of the pricing plan is created that can be edited. A Green Tip: To edit the phase properties in a pricing plan locked using this option, click More Actions menu>select Stop Monitoring. On selecting this option the lock sign changes from Yellow to Red on the pricing plan tab. The phase properties can now be edited. Once you update the phase properties, click More Actions menu>select Resume Monitoring to lock the pricing plan for editing. The Yellow lock sign is again placed on the pricing plan tab. Only the phase properties can be edited using this option, other details in the locked pricing plan cannot be edited. |
| Set as Default Plan | Select Yes to set the current pricing plan as the default planning plan. . |
The lower panel will display all the Errors/Warnings messages (if any)associated to the phases. The pricing plan cannot be activated unless the errors are resolved. The Errors/Warnings checkbox will display the count of the messages. Check the box to display messages under each category. To view all messages check box for Messages.
The Error/Warning messages will clearly display the phase name and the associated errors/warnings. Click the phase name to open the Phase Properties dialog to resolve the error. Once the phases are updated, click the Preflight Check button for a data validation check. If there are no errors displayed, click the Activate button to activate the pricing plan. The pricing plan can be activated without resolving the warning messages.
Note: An Error message will be displayed for incorrect phase dates or if two phases have the same phase code assigned. Warning messages will be displayed for missing phase names, missing phases dates or if two phases have overlapping dates.
Lock Sign on Pricing plan Tab
| Lock Sign | Indicates |
|---|---|

|
The pricing plan is finalized using Lock Phases only option. |

|
The pricing plan is being edited using the Stop Monitoring option. |

|
The pricing plan is finalized using either of the Finalize options> Snapshot the complete plan or Snapshot the complete plan and create a duplicate plan for editing. |
|
|
The pricing plan is marked as default. |
This tool allows you to select each phase from the budget and immediately analyze the impact of any discount or fees ( fixed fee & fee cap) applied to the budget/phase.
A manual refresh option is displayed to update the calculations whenever any changes are made to the phases. By default, the What-If Analysis displays' the KPI's for the total budget. The drop-down for selecting the phases will display the parent phase and all the child phases added within the parent phase. You can select any phase from the Phase drop-down. Click on the + sign next to the What-If Analysis label to add a new What-if tab.
Note: If a child phase is selected from the drop-down, options in the drop-down will not display the parent phase for selection. Remove the child phase to view the parent phase in the drop-down.
| Field | Description | ||||||||||
|---|---|---|---|---|---|---|---|---|---|---|---|
| Phases |
This drop-down lists all the phases added in the plan above. Select the relevant phase to be analyzed. |
||||||||||
| Baseline | Displays the baseline cost and KPI's predicted for the pricing plan (after adjustments) | ||||||||||
| Standard Rate | Displays the firm standard rate cost and KPI's for the pricing plan | ||||||||||
| Criteria |
Allows you to add additional criteria to the pricing plan. You can add discount, fixed fee or both to a pricing plan and immediately view the value comparisons before and after the applied criteria. Select the radio button and enter the value in the text field.
Note: Check box for Add to enter values for discount and fees. |
||||||||||
| KPI Columns |
Displays all the KPI columns. The KPI's to be displayed can be managed from the More Actions >Manage KPI Columns option. Read here for more details on the KPI's. |
You can compare models previously created, or on the fly models.
Note: In the 2019.1 Release, the Save as New plan button is not available. This functionality to save a What-If analysis as a planning plan is coming in a future release.
| Column | Description |
|---|---|
| Total Fees Budget | Budget Amount after Additional Discount |
| Total Expenses Budget | SUM (Internal Expense + External Expense) |
| Total |
SUM (Budgeted Fees+Budgeted Expenses) |
| Realization | SUM (Budgeted Fees)/ SUM (Value at Firm Standard Rate) |
| Value at Firm Standard Rate* | SUM (Worked Hours * VFSR) |
| Average Rate | Budgeted Amount after Additional Discount / Worked Hours |
| Average Billed Rate | BudgetAmount/(Worked Hours - WriteDownHours) |
| Revenue Per Lawyer (Annual) |
Budgeted Amount after Additional Discount /(Partner FTE + Non-Partner FTE ) |
| Cost Per Lawyer | Total Cost / (Partner FTE + Non-Partner FTE) |
| Margin |
(Worked Total- Cost)/ Worked Total |
| Profit Before Partner Share | SUM (Budgeted Fees)- Cost |
| PPP | SUM (Budgeted Fees)- Cost / Partner FTE |
| Cost | SUM (Entered Hours * Cost Rate) |
| Total Lawyer/Partner | Total Lawyer FTE / Partner FTE |
| NPL : Partner Ratio |
Other Lawyer FTEs / Partner FTEs |
| NPLFE : Partner Ratio | (Other Lawyer FTEs + Other Fee Earners FTEs) / Partner FTEs |
| Leverage | SUM(Worked Hours for Non-Partners)/ SUM (Worked Hours for Partner) |
| Equity Partner FTE's | SUM (Budgeted Hours per Equity Partner)/ Annual Target Hours for that Equity Partner |
| Partner FTE's | SUM (Budgeted Hours per Partner)/ Annual Target Hours for that Partner |
| Other Lawyer FTE's |
SUM (Budgeted Hours per Other Lawyer)/ Annual Target Hours for that Other Lawyer |
| Total Lawyer FTE's | SUM (Partner FTE) + SUM (Other Lawyer FTE) |
| Total FTE's | SUM (Lawyer FTEs) + Total (Other Lawyer FTEs) |
| % Partner Hours | SUM (Partner Budgeted Hours) /SUM(Budgeted Hours) |
| Total Hours | Partner Budget Hours + Non-Partner Budget Hours |
| Write-Down Hours | Sum (Entered Hours) removed from matter prior to billing or during the billing process |
*Note: The KPI Value at Firm Standard Rate will not show if the KPI matches the TotalBudget KPI.
A global setting was created for creating automatic levels whenever resources are added to a budget when office and department are not in the hierarchy. The resources can be split to many different levels.
How to set the Global Setting for auto-splitting:
1) Open up Umbria admin panel.
2) Browse to Global Settings.
3) Find the Report Settings tab.
At the top of the Report Settings window, you will see a grouping called Phase Split options. This contains these settings.
4) Check the box next to the specific level or levels to auto-split by.
Split by International Region: A level would be added by each international region. E.g. Western Europe
Split by Country: A level would be added by country. E.g. France
Split by Office: A level would be added by office. E.g. Brussels office
Split by Department: A level would be added by department. E.g. Litigation
5) Click save on the bottom right of the page.
For example, if checking Office and Department, then two levels will be added.
If all levels are checked, this is what the planning page looks like for a resource based budget. Levels are split for Region, Country, Office and Department.
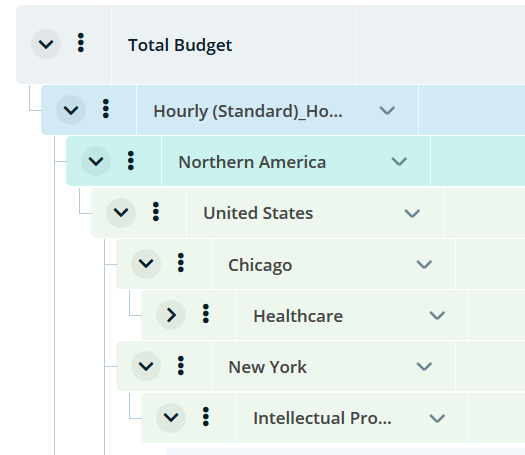
Hierarchy of the levels are: International region, Country, Office, Department. This is also the display order of them.