Importing and Syncing Data
Before you can start using Umbria's core features, you must import data from your billing system into Umbria using SQL Server Integration Services (SSIS). Once you successfully complete an initial import, you can perform incremental imports on a regular basis to keep Umbria synchronized with your billing system. For import philosophy and planning, see the Import Planning page. For changes implemented with version 3.1.1, see SSIS Changes.
For additional import instructions for the Profitability module, refer to Profitability Setup.
Set Up Your Data Source
Warning: Set up the Data Source with this method ONLY if you are planning to import using the Umbria UI functionality rather than importing through the package manually or through a scheduled task. This requires SSIS to be installed on the web server.
To add your billing system as a data source for Umbria:
- In the Admin Panel, type Settings in the Modules search field and click the magnifying glass icon. The folder tree is filtered to show only those modules matching the search criteria.
- Click either the Aderant Expert Settings or Elite Enterprise Settings module under the Integration folder. A settings tab appears in the main application space.
- If importing from Elite, select either Enterprise or 3E from the Version drop-down. If importing from CMS (Aderant), skip to the next step.
- Check the Daily Sync Enabled checkbox if data should sync every day.
- To determine when and how often the sync should occur, do one of the following:
- To set the sync to run at a specific time or multiple specific times each day, select the Specific time radio button. Click the Add button in the Daily Sync Schedule table to add one or more sync start times.
- To set the sync to run every hour (or every two hours, four hours, etc.), select the Hourly radio button and enter the desired frequency in the Sync every (hours) field.
- At the bottom of the tab, click the Add button under the Connection strings section.
- Enter data for the following fields:
Field Description Name Name for this connection. Typically Elite or Aderant. SQL Server Type the IP address for SQL Server where the data source is located. Database Name Type the name of the database. Integrated Security Prosperoware recommends leaving this checkbox selected. Username Username used to access the data source, if not using integrated security. Password Password for username used to access the data source, if not using integrated security. Timeout Prosperoware recommends changing the timeout from 15 to 150. - Click the Update button, then click Save.
Warning: Do not click Start SSIS Sync yet. Complete the next set of steps to edit the SSIS files before running the sync.
Configure the SSIS Package
SSIS uses a package file (dtsx), multiple config files, and a batch bat file to run the import. You will need to modify the config and bat files.
To modify the config and bat files:
- Open Windows File Explorer and navigate to the C:\Program Files\Prosperoware.Umbria\SSIS folder.
- Open Settings.dtsconfig in a text editor such as Notepad.
- Make the following changes to the Settings file:
Field Description SourceDB Data Source= SQL server name for source data. Initial Catalog= SQL database name for source data. Destination DB Data Source= SQL server name for target data. Initial Catalog= SQL database name for target data. Load Staging File Path Path to either Elite or CMS Load Staging folders within the SSIS folder. Update Production File Path Path to the Update Production folder within the SSIS folder. User: Enable Email Notification Enables a status email notification to be sent at end of the import. User: Email From Sets the From email address. User: Email Password The password for the email account sending this email (From address) User: Email Port The port for the email server communication (e.g. 587). User: Email Server The email server, or SMTP server, that will be used to send the email. User: Email To The email(s) that will have the status sent to them. You can use commas to separate multiple addresses. - Save your changes and close the text editor.
- In the SSIS folder, right-click the CommandLineRun Windows batch file and click Edit to open the file in Notepad.
- Enter or verify the following information:
Field Description Path name for Microsoft SQL Server Verify that the path to DTExec.exe is correct for the installed version of SQL Server. If not, copy and paste the correct path. SQL Server Version Path to DTExec.exe 2014 \120\DTS\Binn 2012 \110\DTS\Binn 2008 \100\DTS\Binn /F Input the path to the TimeBillingImport.dtsx file within the SSIS folder. /ConfigFile Input the path to the Settings.dtsConfig file within the SSIS folder. - Save your changes and close the text editor.
SSIS Package and Related Import Scripts
All files required for importing time and billing data are installed to ...\Prosperoware.Umbria\SSIS.
| File |
|---|
| CommandLineRun.bat |
| ImportTimeBillingData.dtsx |
| processdb.xml |
| Settings.dtsConfig |
| SSAS_Settings.dtsConfig |
| UpdateCubeDatabase.dtsx |
SSIS Tables
The following tables in the Umbria database are used by the ImportTimeBillingData SSIS package during an import.
| Table | Description |
|---|---|
| Caliban.SSISScriptPaths | Specifies which import scripts to run and the order in which to run them. |
Note: LastRunTime is Null or blank until you run the Create script from the Init folder. Then, by default, LastRunTime will be 1970-1-1, and Enable is set to 1 for all scripts.
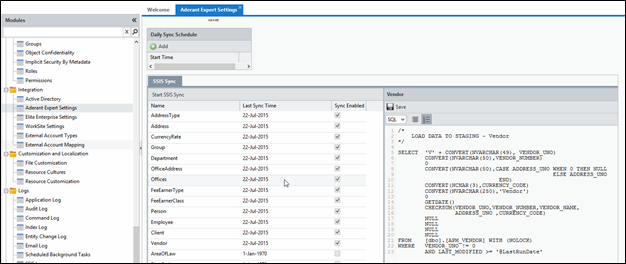
You can manually change these times and whether scripts are enabled or not (or one of the other options via SQL or within the UI). Go into the Admin Panel. If you are using CMS Aderant, go to Aderant Expert Settings (as shown in the screen shot below). If you are using Elite Enterprise or 3E, go to Elite Enterprise Settings. Under SSIS Sync, you will see a list of script names, last sync times, and whether each script is enabled. Double-click a script to edit it.
There are multiple steps that occur with each sync:
- Staging tables get their indexes removed and are truncated.
- The SQL script files are brought in.
- A loop goes through the Staging script files to make sure files are present.
- For each Staging script file, we load the data from the time and billing system into the appropriate Staging table. We bring all data into Staging.
- Indexes are added to the Staging tables (for performance).
- We get the table names from Umbria that need to be imported.
- Another loop goes through the Production script files to ensure they are present.
- Each enabled script then loads data into Production.
- Finally, a built-in validation compares the count of rows imported into the Staging tables to the count imported into Umbria.
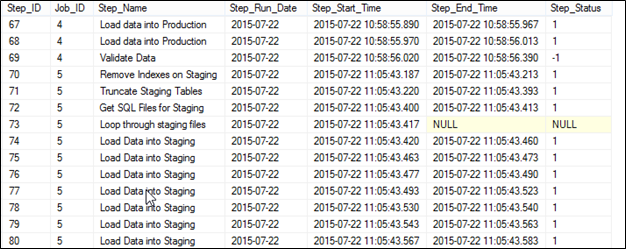
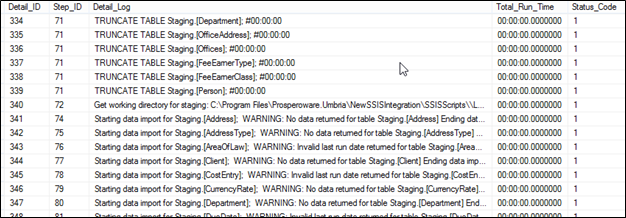
Caliban.JobStepsDetails gives a lower level view of the JobSteps, including the run time for each of the job step portions. For example, you can see where we are truncating the Staging.[Matter] table at the beginning of the process, or when we are processing Employee.sql on the Production load step.
Note: For these tables, the Status_Code column allows you to pinpoint a failure or warning. A status code of -1 means there is an error, while 1 means that it was successful. Other possible statuses are Null (running) or 0 (unknown).
If there happens to be an error during the import, the error is captured in 1 or 2 tables, depending on the error and the part of the import. For specific errors on scripts or import inserts, the error is in the SSISJobStepDetails folder on the line that it failed on, as well as in the SSISErrors folder. SSIS errors, SQL errors, and system failure errors that occur before the sync actually starts are found only in the SSISErrors table.
The SSISErrors table contains information on the error date, package name that was running, source name (step of the import), task, error code, and error description.
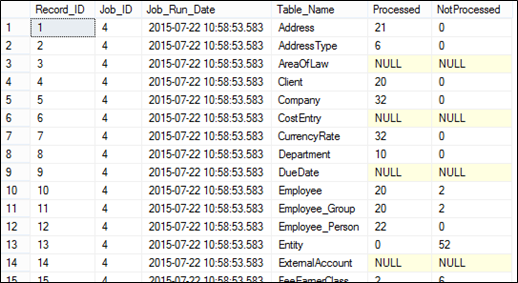
Caliban.SSISDataValidation contains the validation count results for the different tables during the import, with the amount processed and not processed for comparison.
Modifying SSIS Configuration Files
- Make any modifications to the Staging files if needed, and copy/replace all the files from your relevant time and billing Staging table to the Load_staging folder. Make any changes to the update_production scripts if needed as well.
- Either in SQL from the Caliban.SSISScriptPaths folder or from the Umbria UI, configure and enable the SSIS scripts you want to import.
- From the root level of the NewSSIS folder, edit the commandlinerun.bat file:
- Right click and open with Notepad or a similar tool.
- Make sure that the path of the DTExec file is correct:
- Those with 64 bit SQL, need to remove the x86 part of the path.
- The number of the folder changes depending on the version of SQL installed.
SQL Server Version Folder Number 2016 130 2014 120 2012 110 2008 100
- Change the path for the ImportTimeBillingData.dtsx file (e.g., C:\Program Files\Prosperoware.Umbria\NewSSIS\ImportTimeBillingData.dtsx).
- Change the path for the Settings.dtsConfig file (e.g., C:\Program Files\Prosperoware.Umbria\NewSSIS\Settings.dtsConfig) and click Save.
- Edit the Settings.dtsconfig file from the same root level folder.
- Right click and open with Notepad or a similar tool.
- On the second line, the DestinationDB connection string, put the server name in for Source, the Umbria database in for the initial catalog. If you use SQL authentication, modify the integrated security line and add in user= and password= portions.
- On the third line, the SourceDB connection string, put the server name in for Source, the time and billing system database name to be synced from for the initial catalog. If you use SQL authentication, modify the integrated security line and add in user= and password= portions.
- On the fourth line, the SourceFilePath connection string, point to the file path of the SSIS scripts (e.g., C:\Program Files\Prosperoware.Umbria\NewSSIS\SSISScripts\).
- Setup the email fields only if you want to use the feature and it is enabled in SQL, then click Save.
Setting Up Daily Incremental Syncs
Below are high-level points regarding how the daily incremental syncs work.
- We need an always-available temp table on the same SQL server as the firm’s time and billing database (CMS, Elite, 3E) with read/write access. Optimally, the firm should allow use of their time and billing database for this purpose; otherwise it needs to be on a database on the same server.
- We append to this table rather than recreating it every day. This way, we always pick up changes to existing matters in the Umbria database.
- We add a script to pull all the matters, within scope, for each client and add matters to the temp table each day.
- We modify our client, matter, time entry, matter invoice, invoice payment, and internal costs scripts to join on the temp table to pull data for matters.
Confirming Import Status
To confirm import status:
- In the Admin Panel, open the Command Log module under the Logs folder.
- In the TaskDescription column, look for an entry that reads either Synchronization with Elite database or Synchronization with Aderant database. (You can also use the Filter option at the top of the list to filter by a portion of the TaskDescription.)
- Check the CommandStatus column and verify that the status is Success.
Tip: If the status is Failed, return to the beginning of this topic and verify that all your settings are correct. If the import continues to fail, contact Support for assistance.
Initiating an SSIS Import
An SSIS import can be started from either the command line or directly within Umbria. Importing through Umbria is a slightly slower process, as it uses IIS Manager.
Tip: When an import is started from the command prompt, the import will continue even if you log off of your computer. However, if importing through Umbria, you are unable to log off the computer.
Command Line
- Open Windows File Explorer and navigate to the C:\Program Files\Prosperoware.Umbria\SSIS folder.
- Double-click the CommandLineRun Windows batch file.
- Press any key to continue, then follow the on-screen instructions.
Through Umbria
- In the Admin Panel, open either the Aderant Expert Settings or Elite Enterprise Settings module.
- Click the Start SSIS Sync button.
Service Agents
To configure Service Agents:
- In the Admin Panel, under Manage, click Service Agents.
- In the Registered Agents list, select WindowsService.
- Under Agent Jobs, select the Enabled checkbox for CommandProcessing and DatabaseLogging.
- In the Registered Agents list, select WebServer. Ensure that none of the Agent Jobs are enabled.
- Select the appropriate Processors at the bottom of the page, depending on your configuration. You can set the Service Agent as WindowsService.
Note: For any new Service Agent added, the Agent Jobs will not be enabled by default. The Administrator must manually enable the jobs for the new Service Agent added.
Import Background Tasks
This section covers what processes run in the background during the initial import of data as well as during incremental updates.
Indexing:
Umbria creates indexes for searching and for user interface interaction with the data, and also sets security on items.
- If Command SQL is enabled on imports, then indexing and update stats run automatically.
- For incremental imports, the SSIS package and indexing look at the checksum columns (a combination of fields imported) and compare them with the columns calculated on import. If there are any discrepancies, the import and indexing run again.
Update Statistics:
Refer to the Update Statistics section for more information about this process.
Logging
Update statistics are logged in two places: the Command Log and Application Log.
- Command Log: An entry appears for updating statistics. The Log tab contains the log traces on progress. This log stops populating after approximately 100 log entries; see the Application Log for more complete information. Possible statuses include the following:
- Executing: stats process is running.
- Canceled: a user canceled the process.
- Interrupted: a system-level process, connection/locking issue, or timeout caused the sync to stop.
- Success: job completed successfully (there may still be errors on individual entries in the log).
- Application Log: An overview of each log entry in the command log is logged here until the completion of the process. All entries are shown.
Note: When running the SSIS 2016 package the following error may be displayed:
Could not load file or assembly 'Microsoft.SqlServer.BatchParser, Version=12.0.0.0, Culture=neutral, PublicKeyToken=89845dcd8080cc91' or one of its dependencies. The system cannot find the file specified.
To resolve this error, there are two options:
Use the Windows Command Line
- Change the file path of DTExec from 64 bit to 86 bit in the batch file i.e. CommandLineRun.bat
- The default path in the batch file is C:\ Program Files \Microsoft SQL Server\130\DTS\Binn\DTExec.exe change this to C:\ Program Files (x86) \Microsoft SQL Server\130\DTS\Binn\DTExec.exe
OR
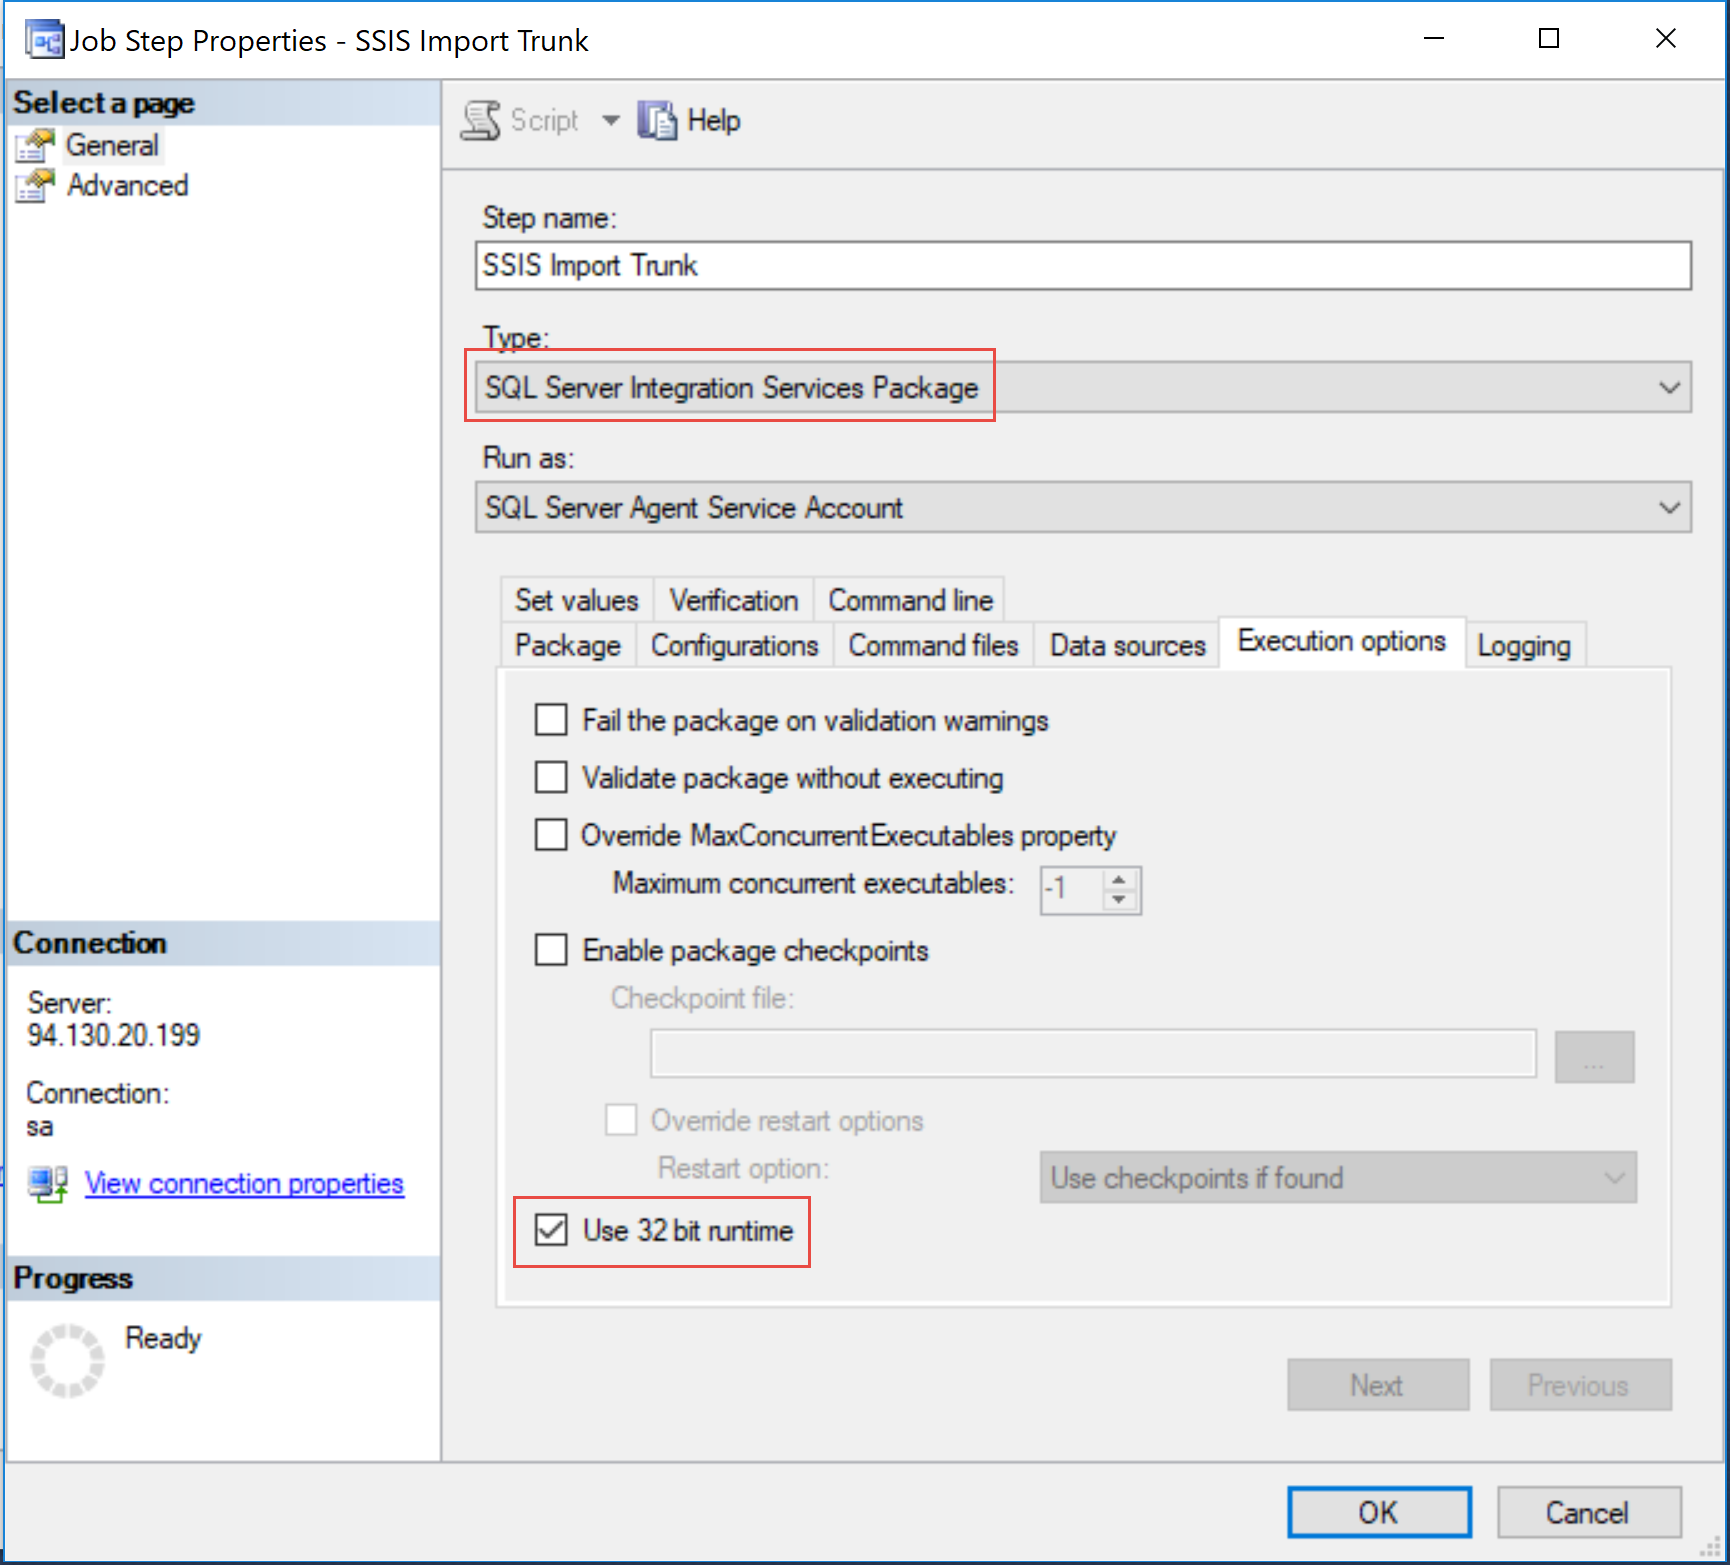
Use the SQL Server Integration Services Package
When you configure SQL 2016 job for import using the SQL Server Integration Services package, check the box for Use 32 bit runtime