Office 365
Office 365 is a web-based system that allows the user to access and share files and information. To integrate CAM with Office 365, the Office 365 cloud servers must be configured here. You can add and manage multiple Office 365 servers, define the group name rules to be applied, and the default metadata mapping.
Register Office365 App on your Office 365 server to be accessed for provisioning from CAM. Following details are required during External System Configuration: the Directory(Tenant) Id, Application Id and password, follow these steps:
- Login office365 with Global Admin Access. Go to “Azure portal”. https://portal.azure.com/#home.
- Go to “Azure Active Directory”.
- Click on “App registration” in left side bar.
-
Click on “New Registration” tab.
- Set a name for it, and select Multitenant.
- Fill RedirectURL with a redirect URL listed here: Redirect Endpoints
- Click Register to register the Add-in. The system will show a successfully created message with the information created.
- Find the Application ID, Directory(Tenant) Id field.
- This goes to the Application ID and Directory(Tenant) Id field in the Office 365 configuration panel in CAM.
- Then go to the Certificates and Secrets page in Azure.
- Pull the Secret.
- This goes into the Application Password field in the Office 365 Configuration panel in CAM.
Note: Save the retrieved information (client id and client secret), since you will need this in the next step ahead and to enter in the Office365 configuration setup.
Redirect Endpoint URI's
Redirect Endpoint URI's are as follows:
| Domain | Region | URI |
| Staging/Production URLs are used for CAM to connect Office 365. Select staging or production URIs based on the environment you are setting up. | ||
| Staging | EU (eu-west-1) | https://indfh04pbk.execute-api.eu-west-1.amazonaws.com/v1/cam/auth/redirect |
| Staging | US East | https://4cpwp6xw51.execute-api.us-east-1.amazonaws.com/v1/cam/auth/redirect |
| Production | UK (eu-west-2) | https://5cerfmm2b5.execute-api.eu-west-2.amazonaws.com/v1/cam/auth/redirect |
| Production | EU (eu-west-1) | https://y20ve77is6.execute-api.eu-west-1.amazonaws.com/v1/cam/auth/redirect |
| Production | US East | https://90uqmfzsbl.execute-api.us-east-1.amazonaws.com/v1/cam/auth/redirect |
| Production | APAC (ap-southeast-1) | https://c9efufodx8.execute-api.ap-southeast-1.amazonaws.com/v1/cam/auth/redirect |
| If you are using the CAM teams app, then Microsoft Office 365 URIs are required. It allows accessing documents that a user has access to in Teams or all shared documents like Teams/SharePoint/OneNote/OneDrive. | ||
| Microsoft Office 365 | UK | https://camteamapp.prosperowaredev.co.uk/team/ukprod/web/auth-end.html |
| Microsoft Office 365 | EU | https://camteamapp.prosperowaredev.eu/team/euprod/web/auth-end.html |
| Microsoft Office 365 | US | https://camteamapp.prosperoware.io/team/usprod/web/auth-end.html |
| Microsoft Office 365 | APAC | https://camteamapp.camapac.com/team/apacprod/web/auth-end.html |
Office 365 Microsoft Graph Permissions
The following permissions will need to be enabled in the Azure Portal.
- Go to "Azure Active Directory".
- Click on "App registration" in left side bar.
- Select the registered app (Office 365 Registration).
- Click on "API permissions"
- Now configure new permissions, Click on "+ Add a permission"
- Select "Microsoft Graph"
- Now add Delegated and Application Permissions provided below
- Click on "Add permissions" and select "Grant admin consent for <global admin user>"
Delegated Permissions:
| Delegated Permission |
|---|
| Calendars.Read |
| ExternalItem.Read.All |
| Files.Read.All |
| Group.ReadWrite.All |
| Mail.Read |
Application Permissions:
| Application Permission |
|---|
| Directory.ReadWrite.All |
| Files.ReadWrite.All |
| Group.Create |
| Group.ReadWrite.All |
| GroupMember.ReadWrite.All |
| Notes.ReadWrite.All |
| Sites.ReadWrite.All |
| TeamsTab.Create |
| TeamsTab.ReadWrite.All |
| User.Invite.All |
| User.ReadWrite.All |
Private Channel Create Permission
CAM is using Azure AD - Microsoft Graph API - to access resources in Office365 to create Groups and Teams.
When you create a private channel, it has its own SharePoint site collection. The separate site collection is to ensure access to private channel files is restricted to only members of the private channel compared to the team site where team owners have access to all the assets within the site collection
The site collection created using private channels as per Microsoft documentation is not visible in the Sharepoint admin center unless someone would manually click the Files tab in teams when the Sharepoint site will be available in 1-2 min or almost instantly.
To trigger the click event on the Files tab CAM needs Microsoft native API permission which can be added by following the below steps.
- Login office365 with Global Admin Access. Go to the “Azure portal”. https://portal.azure.com/#home
- Go to Azure Active Directory.
- Select the registered app (Office 365 Registration).
- Click on Manifest in the left sidebar.
- On the right side, scroll down till the end.
- Search requiredResourceAccess list.
- Put comma , after the previous node then copy below node in the List.
- Click Save.
-
Now click on API permissions in the left sidebar.
-
On the right side, scroll down till the end.
-
It will list user_impersonation under Microsoft Teams Services, status as Not granted for <global admin user>.
-
You need to provide admin consent, click on select Grant admin consent for <global admin user>.
-
It will prompt confirmation message, select Yes, add other granted permissions to configured permissions.
-
Click Save and Continue.
-
Follow the instructions till permissions are granted successfully.
Snapshot of Manifest
{
	"resourceAppId": "cc15fd57-2c6c-4117-a88c-83b1d56b4bbe",
		"resourceAccess": [
		{
			"id": "fd7bf697-168c-45be-b7ba-e94b3529deff",
			"type": "Scope"
		}
	]
}
To add a New Office 365 Connection:
- Open External System Configuration from the Administration tab.
- Click the Office 365 tab.
- In the panel for Office 365 Authentication click the Add New button.
- In the window for Office 365- Add New, type information in the provided fields, based on the table below, then click Save.
| Field | Description |
|---|---|
| Name | Enter a name for the Office 365 configuration. This is a required field. |
| Auth URL |
The URL of the Office 365 portal. This is a required field. By default this is: https://login.microsoftonline.com/common/oauth2/v2.0/authorize |
| Directory(Tenant) Id | Enter the Directory Id from the Azure Active Directory. Read here for detailed instructions to retrieve the Directory Id |
| Application Id | Enter the Application (client) ID from the Azure Active DirectoryPortal. Read here for detailed instructions to retrieve the Application ID. |
| Application Password | Enter the application password. Read here for detailed instructions to retrieve the Application Password. |
| SharePoint URL | Enter the SharePoint URL to access. For e.g. https://<sitename>.sharepoint.com |
| SharePoint Resource |
Enter the SharePoint resource information. The information must be entered in the format <resource>/<sharepointURL>@<ApplicationID>. Note: Set resource to by default value : 00000003-0000-0ff1-ce00-000000000000 |
| SharePoint Client Id |
Copy Application Id and enter into the SharePoint Client Id. |
| SharePoint Client Secret |
Copy Application Password and enter into the SharePoint Client Secret Key. |
| Additional Service Account | For the Microsoft Planner tab, create a new user at Office365 and provide an email address. This account should be any account other than Token user. It can be any user with no specific requirement. |
| Get Token | Click the Get Token button, to log in to the Office 365 URL specified above. On successful login, the token is displayed here. |
| Is Default | Select Yes to set Office 365 as the default external system. |
| Dynamic Group | Select Yes to create a dynamic group in the Office 365 workspace. Selecting this option will allow you to add multiple users to the to the security list of the workspace. Read dynamic groups for more details to create and add users to the group. |
- Click Save.
The configured O365 Authentication(s) display in the table, with the following information:
| Column Name | Description |
|---|---|
| Name | The Office 365 configuration name entered above. Hover your cursor over the name to view the Office 365URL. |
| Token |
Token generated on successful login to Office 365. |
| Last Refreshed |
The last updated date and time when changed. |
| Is Default | Is updated based on selection made during configuration. The selection sets if the record will be the primary default Office 365 system |
| Dynamic Group | Is updated based on selection made during configuration. The selection sets if the groups will be dynamic or fixed. |
| Updated By | Name of the user who was logged in when the change was made |
| Action | Click Edit to edit the configuration set up. The Office 365- Edit window is displayed. Make the necessary changes and click Update. Click Delete to remove the setup. |
| Metadata | Click Manage to edit or update the Metadata to sync. |
- Continue down to the Group Name Rules section.
- Click Add New.
- Fill out the information as listed in the Group Name Rules section here
- Then fill out the Metadata Mapping section here.
Editing an Existing Configuration:
- Click the Edit button in the Action column for the section to be edited (Authentication, Group Name Rules, Metadata Mapping).
- Make the changes necessary.
- Click Save.
Define the Office 365 group names rules and format to be applied
- Click the Office 365 tab.
- In the panel for Group Name Rules click the Add New button.
- In the window for Add Rule Creator, type information in the provided fields, based on the table below, then click Save.
| Field | Description |
|---|---|
| Is Default |
Select Yes to set the workspace name as the default format. Note: If the workspace name is not specified in the CSV file uploaded via the Jobs tab or in the SQL file uploaded via the Data Uploader, the workspace name set as default here, will determine the workspace name format. |
| Rule | Enter a name for the rule |
| Format |
Enter a format for the workspace name to displayed. A sample rule is displayed as the placeholder in the format field. Tip: The naming format is suggested as "Client ID- Matter ID- Matter Name" {@ClientId@ - @MatterId@ - @MatterName@} |
| Metadata |
Select the metadata from the drop-down. The metadata drop down will display both the metadata name and the display name added. To assign a metadata, either click the drop-down menu and select it from the list or manually enter the value, which will auto-complete if it is assigned in Administration>Metadata. In the corresponding text box, type the metadata value to be matched for the rule to be applied.
Select the search operator from the drop-down. You can also combine the two search operators.
The Workspace rule will only be applied if the search criteria matches with the metadata defined here. Enter the equivalent metadata on the right side of the equals sign.
|
Click Save.
The configured group name rule(s) display in the table with the following columns:
| Column Name | Description |
|---|---|
| Rule | The rule name. |
| Format | Workspace name format. |
| Is Default | The selection sets if the record will be the primary default rule. Is updated based on selection made when adding workspace name. |
| Action/ Edit | Click to edit the workspace name and rules. The Edit Rule Creator window is displayed. Make the necessary changes and click Update. Click Delete to delete the rule setup. |
Map the metadata for Office 365 group with these steps:
- Click the Office 365 tab.
- In the panel for Metadata Mapping click the Add New button.
- In the window for Add Metadata Mapping, type information in the provided fields, based on the table below, then click Save.
| Column Name | Description |
|---|---|
| CAM | Select the metadata from the CAM system to be mapped to Office 365. |
| Office 365 | Select the metadata from Office 365 to map to the CAM system. |
| Is Unique Identifier | Select Yes to set the metadata value as a unique identifier. When a job is uploaded with a unique metadata, CAM will only modify the Office 365 workspace(s) that have the unique metadata assigned. If the unique metadata does exist in any of the existing workspace(s), CAM will create a new workspace for the uploaded job. |
Tip: Another method to access the Metadata Mapping screen is to click the Manage button in the metadata column in the Office 365 Authentication section for a particular Office 365 site. From there, you can view metadata configured, and click Add Metadata, which is the same as the Metadata Mapping section.
The completed metadata displays in the following columns in the table:
| Column Name | Description |
|---|---|
| CAM | Metadata from CAM mapped to Office 365. To assign a metadata, either click the drop-down menu and select it from the list or manually enter the value, which will auto-complete if it is assigned in Administration>Metadata. |
| Office 365 | Metadata from Office 365 mapped to CAM. The drop-down will include all the metadata defined in the Office365 database. |
| Is Unique Identifier | Is updated based on selection made when adding metadata |
| Action | Click to edit the mapped metadata. The Edit Metadata Mapping window is displayed. Make the necessary changes and click Update. Click Delete to delete the metadata mapping. |
Click Edit Configuration in the Office 365 external System Configuration.
At the bottom, select the CAM Roles. Map them to the Office 365 role permissions.
- Member
- Owner
Guest Accounts can be created in CAM for Office 365. If creating guest accounts externally, there are no password requirements, but a password can be set, as the user is created temporarily without a profile.
Invite Guest Users from Request Workflow -> Default Security Or upload CSV.
Sample CSV for uploading External Guest Accounts
When creating users, a default password can be set.
How to create a default password:
- In the CSV, add a column for TempPassword.
- Put the default password.
- Then add a column ForceUserToChangePassword.
- Set to 0 if you want the user not to be forced to change this password. Set to 1 to have the user change the password upon first login to Office365.
CAM Microsoft Teams app
Read the Teams page for more information on how to install CAM teams app, required permissions and creating Teams, Channels, OneDrive, OneNote and Planner. Also how to access CAM application from Teams.
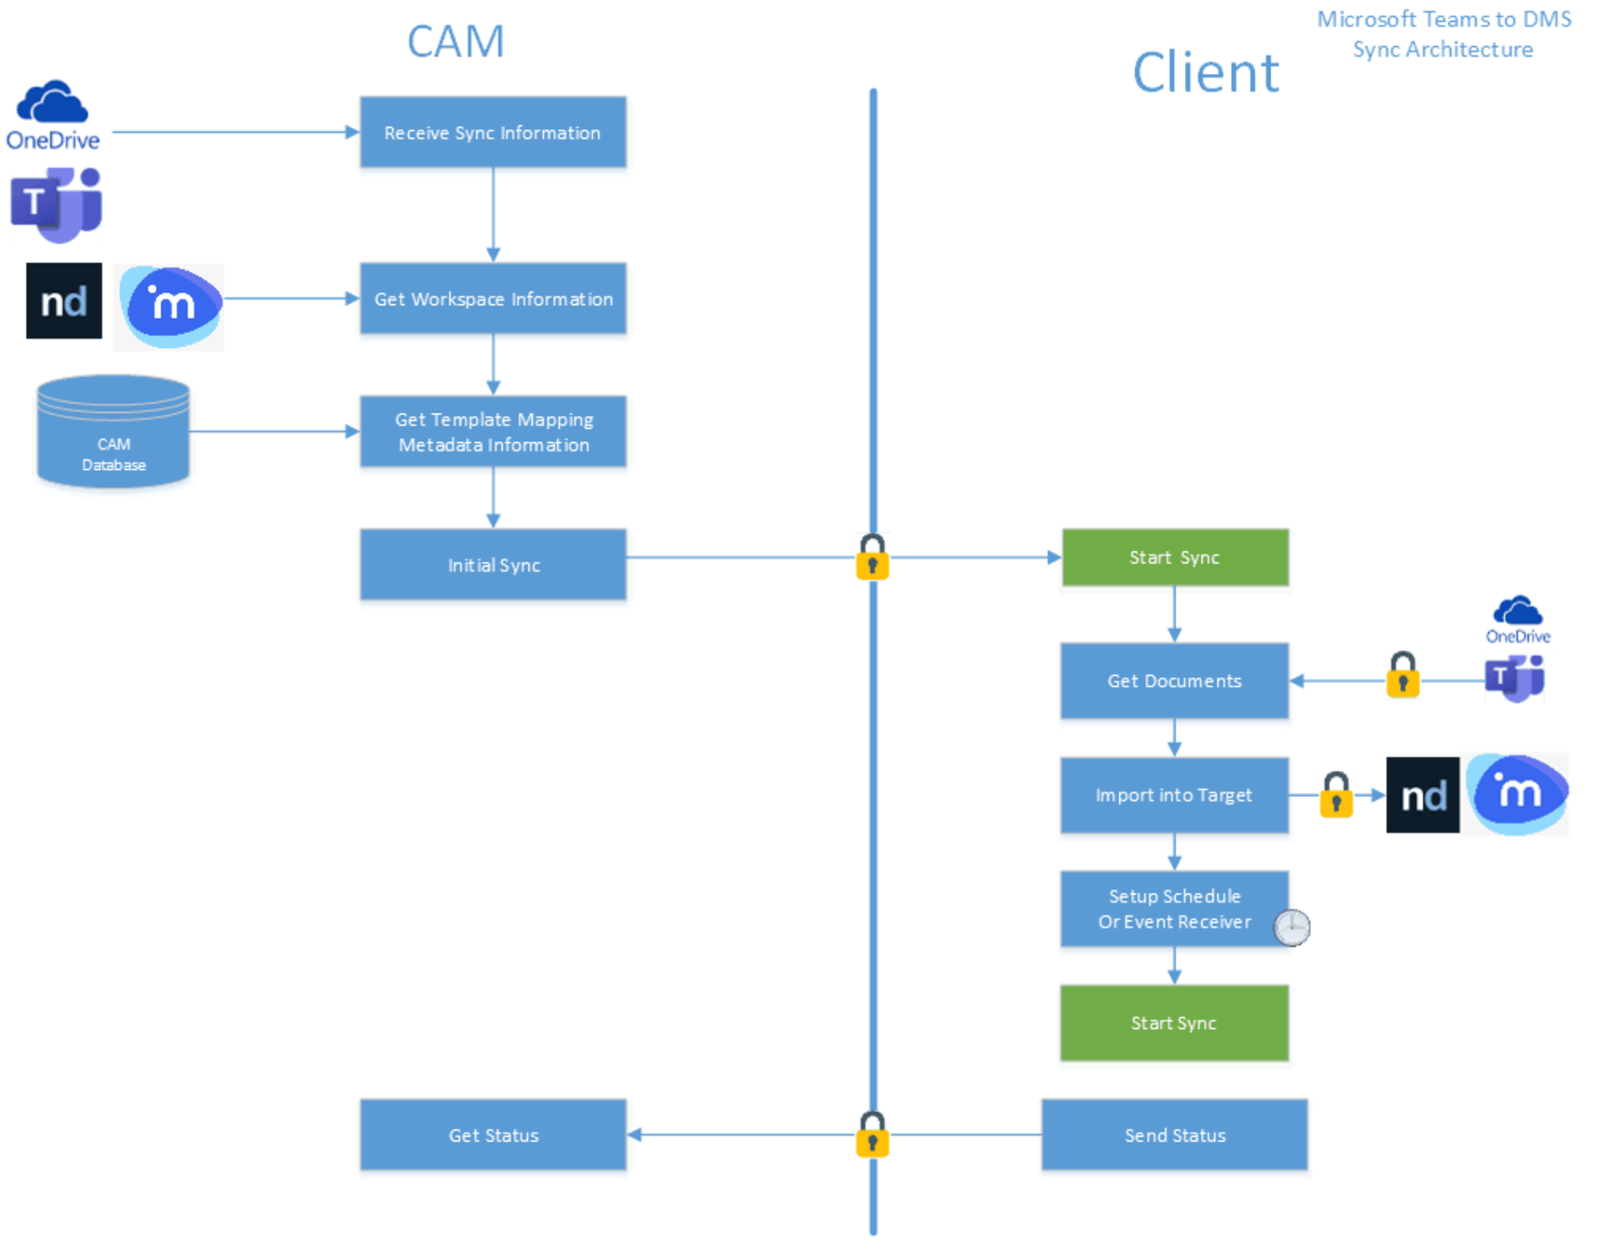
Teams and ETL
Read the ETL page for more information on how to use ETL to move or copy or link Teams, Channels, Tabs to a DMS system, and examples.
Teams and Template Editor
To use Template Editor to create Channels, tabs and Teams, read here for steps.
Note: The job will not show errored if a user is missing from CAM during the Create Team/Tab or Channel process. The job inside will error in the log only.